This is a tutorial for the Champions custom card maker by Landstander.
This tutorial is a work in progress. If you have feedback, let me know.
Quick start
If you want to get started making your own cards right away, here's how.
To make an individual card:
- Add a new card, clone an existing card, load a card form MarvelCDB, or load an example
- Change the card type
- Add a title, rules, and all the other card text
- Add photos
- Change colors
When you're done with a set of cards:
- Organize the cards into a set
- Give them all the same colors and headshots
- Sort and number the cards in the set
- Export the cards for print or digital tabletop
- Save the cards so you can change them in the future
Basics
What is the Marvel Champions Card Maker?
This is a tool to help you make your own cards for Marvel Champions quickly and easily, for print or digital play.
You can use it to create:
- Promo style cards
- Alternate art cards
- Custom heroes and villain cards
- And more - see all examples here.
When you're done, you can save the images for print, export them to virtual tabletops, and more.
What this isn't
This is not a tool to create perfect cards. There will be differences between this and a real card, and I don't care if things are a little bit off.
If you want perfect cards, learn photoshop. If you ask me to make something a tiny bit more like a real card, I will make fun of you for ignoring this because that is not my goal.
Get help
If there are real problems, post in this discord channel. I will ignore and block your DMs.
Include all of the following. If you don't, I can't help you:
- A screenshot of the problem
- The exact steps to reproduce it
- If possible, a save file (.json or .zip) that I can load to see the issue
Load and save cards
If you want to learn how to save your cards as images or export them, check the Exporting Cards part of the tutorial.
Load MarvelCDB cards with translation
To load a card from MarvelCDB, you need the ID of the card. It is at the end of a card URL like below (in bold)
https://marvelcdb.com/card/07006
Select Load Cards from MarvelCDB in the Load menu. Then enter the ID in the form, choose your language, and submit.
You can also load multiple cards at once with IDs separated by commas: 01001a,01001b,01002
If you selected a translation but the card is still in English, that means it has not been translated. Help out by sending a translation to the MarvelCDB team.
Load saved cards
To load cards, click the Load Card button. Then select the .json or .zip files with your cards. You can load multiple files at once.
If you saved cards to your browser, choose Load Card -> Load from Browser and choose a card set from your browser storage.
There are also other loading options which will let you load files while clearing any existing files.
Example cards
There are lots of example cards to help you get started. Load them in the Examples section.
Learn more about examples here.
Add a new card
To add a card, click the Add New Card button. It will create a blank card that you can fill in.
Change card type
You can change the type of card by changing the Card Type field. You can make every type of card in Marvel Champions plus promo style cards.
Clone a card
To clone or copy a card, click the clone icon to the right of the card you want to copy.
Save cards
To save cards to your computer, click the Save Cards button. You will get a zip file with all your cards.
To save cards to your browser, choose Save Cards -> Save to Browser. Your cards will be saved to your browser storage.
Learn how to load saved cards here.
Editing card text
Add or edit card text
There are two ways to change card text:
1. Hover over the text in the preview. If you see a glowing border, click it and start typing.
You can see all editable sections by hovering over the "What can I edit?" block at the top of the page.
2. Use the form on the left hand side. Your changes will automatically appear in the preview. These fields accept some HTML, but not all HTML will look correct in your exported images, even if it is correct in the preview. See a list of Champions-specific HTML codes here.
Add special characters to text
Sometimes you will want to add a p or a t or even a h.
If you are editing the preview, hit the special character menu in the toolbar, then click the character you want.
If you are using the form, hit the button on the virtual keyboard beneath the field.
Add special fonts to text
Select the text that you want to change, then click the button that matches the font you want.
Set resources on a hero card
Use the Resource options to set the resource icons. Make sure you add them in the right order, filling the bottom of the card first.
Advanced Edit mode
Many formatting options like line height adjustment or translation options are hidden until you enable the advanced edit mode.
Turn them on by ticking the Advanced Edit box towards the top of the form.
Translating card text
You can translate the text on the card like ATK or the card type. Some card parts can be edited in the preview.
You can also use the form to translate parts of the card if Advanced Edit mode is enabled.
Adding images
Add photos to a card
Put an image on top of card text
There are three kinds of photos - behind, front, and headshot.
To add background art, upload your photo in the Photo Behind section, then adjust the position and zoom with the sliders.
img
If you want a photo that sits on top of the card text, load that in Photo Front.
img
See the Kamala Kahn example as an example of using Photo Front so that the image sits on top of the card text.
The ideal image is 1500x2150px. Smaller or larger photos will be resized best as possible.
Adjust images
Move images
Zoom images
To precicely position an image, use the Zoom Level, Left-Right, and Up-Down sliders to adjust the image.
Instead, you can upload an image that is exactly 1500x2150px, then set the zoom to 1 and both positions to 0. That will fully fill the photo space so you don't need to make adjustments.
Add a headshot to a card
Use the Corner Headshot file upload. Make sure the photo is a PNG or WEBP file with a transparent background so that the card shows through.
Make sure the Show Corner Headshot box is checked too or your photo won't be visible.
If you want the old style star background behind the headshot, tick the "Star splash" box.
img
Clear images
If you want to clear an image, click the "Clear" button to remove it.
Card colors
Identify card parts
Cards have a complex color scheme, and you can view those parts in the card maker. To see which color affects which part of the card, hover your mouse over that color item. The card will glow showing you what it changes.
Set a color to RGB
Click the color tile that you want to change, then type in the RGB hex value in the box that appears.
Match a color to a photo
Click the eyedropper icon on the color you want to change, then click on the pixel you want to match. The color will update automatically.
Card bottom shadow
If you can't read the white text on the bottom of the card because of your color scheme, tick the "Add bottom shadow" box. This will darken the bottom of the card so the text is readable.
Loading aspect colors
If you're maing a regular aspect card, click on the "Aspect color shortcut" box to set the card's color for that aspect.
Loading colors from other Champions sets
If you want to match this card's color to an existing Champions card, choose that card in the pulldown next to "Colors" and click "Load colors". Your card's colors will be changed to match that set.
Set management
The Set Manager is a powerful tool to automatically sort, number, and color your cards across a set.
- Open the set manager
- Group your cards into sets, then name your sets
- Click Auto Sort, or manually sort the cards
- Click Save. Your cards' set names are numbers are now updated!
Open the set manager
Click the Set Manager button to open the set management tool.
If you have multiple sets open, you can open a single set in the set manager by clicking the pencil next to that set's name in the loaded cards list.
Arrange cards into sets
The set manager will automatically try to group cards into sets, but it might be wrong.
To add, remove, or change groups, drag and drop cards into the sets you want.
Change the set name
Click the pencil next to the set name, change the name, then hit enter to save it.
Note that this will not change any text your cards until you click Save in the set manager.
Sort a set of cards
The Auto Sort button will put all your cards in the correct order for numbering.
Cards in a Marvel Champions appear in a specific order. Once your cards are grouped correctly, click the Auto Sort button. This will automatically put your cards in the correct order.
Note that hero/alter-ego cards and obligations do not get set numbers.
If you want villain HPs, run the set manager so that it gets a card number, then add "/ Hit Points ##v" to the end of the set line.
Learn more about how Champions cards are sorted and numbered here.
Number cards in a set
To add numbers to a card when auto-numbering, make sure the number icon next to the card name is dark. When you click Save, that card will be automatically numbered correctly.
You can also turn on numbering for all cards in a set at once by clicking the number icon next to the set name.
Remove numbers from cards in a set
If you do not want a card numbered, click the number icon next to it so it looks faded , then click Save. Those cards will not receive numbers, but they will have their set renamed.
You can also turn off all nubmers for the set by clicking the number icon next to the set name.
Change set card colors
You can easily change colors on all cards in a set. Find the card whose colors you want to apply to your set, then click the colors icon. All the colors of cards in that set will be updated to match the selected card.
Save your set changes
To save the changes you made in the set manager, click OK. That will update the card set names and numbers to match your changes.
If you do not click OK, your changes will not be saved.
Villain HP in the set manager
Villain cards have the set "Set Name / Hit Points ##v".
Clear the set line. Open the set manager, name your set "Set Name" (or whatever your set is), then run Auto Number and save.
Finally, edit the card to add " / Hit Points ##v" in the set line. When you run the set manager in the future, the hit points will be kept, even if you change the set name.
Exporting cards
You can export cards from the card maker into many formats:
- Individual images or PDFs for printing
- Files for local play on TTS or OCTGN
- Files for online play on TTS, Dragncards, or Cardtable
Keep reading to learn more
Getting an img.bb API key
If you want to play your cards in any online tabletop like Cardtable or Dragncards, the card images must be available through the web.
This tool automates that process if you provide a free img.bb API key. When prompted, paste your API key into the form. Everything else will be handled by magic.
Your API key is only stored in memory and is cleared when you close the card maker. The API key is only used to upload cards when you request it.
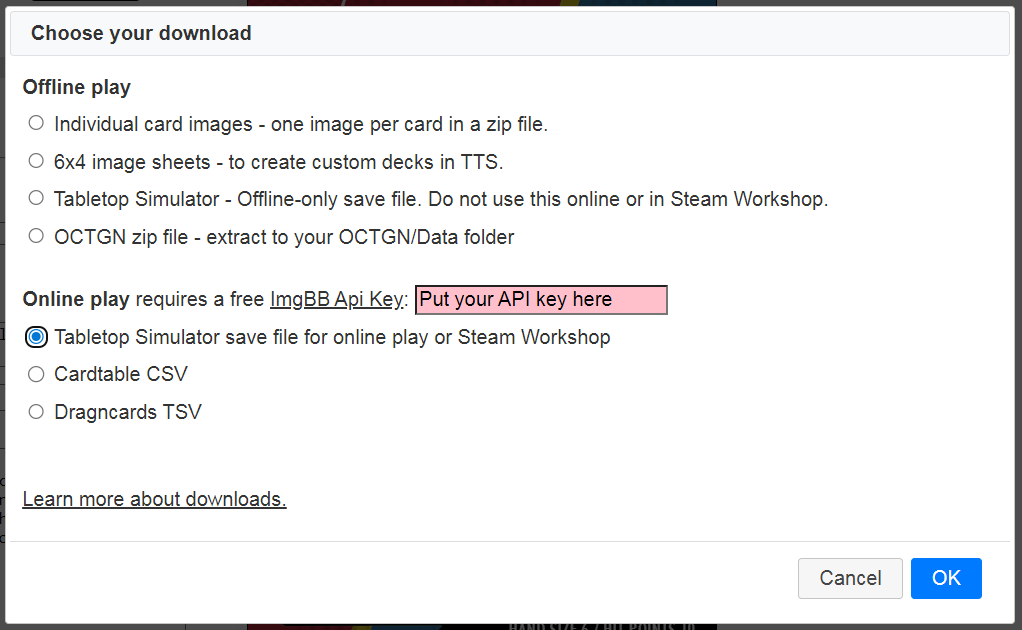
Tabletop Simulator
For online or offline play, you need to load your deck into a table. Once you open your favorite Marvel Champions workshop table, go to Games -> Save and Load -> ... on your deck save file -> Search, then drag in your deck bag into your table.
Online play: To play with your cards online or to upload them to Steam Workshop, you need to use the Online TTS export option using your img.bb API key. After the .json file downloads, put it in your TTS save directory. Use this if you want to play a deck online with friends.
Offline play: To play with your cards offline, use the offline TTS export, then unzip the file in your TTS directory. You will not be able to play this deck with other people online.
The most common location for your TTS files are:
- Windows - \Users\<YourUser>\Documents\My Games\Tabletop Simulator\
- Linux/OSX - ~/Documents/My Games/Tabletop Simulator/
You can also create the decks yourself by exporting the images individually or as a 6x4 image to create the custom decks yourself. Learn how to import the 6x4 sheets into TTS here and learn how to rotate your cards.
Cardtable
Take the CSV file from the tool and upload it to Cardtable using the menu: Custom Content -> Import -> Pick your CSV to load it into the app.
To put your custom cards on the table, use Custom Content -> Load -> Pick your sets and choose the set you uploaded.
Dragncards
To load your custom cards, start a Marvel Champions game, then select Builder -> Custom Content -> Pick your TSV. You may want to edit the TSV before uploading to fill in columns that cannot be automatically filled like acceleration values or hazard icons.
Watch this to learn how to add your custom cards in a deck and place on your table.
OCTGN
Unzip the GameDatabase and ImageDatabase folders to your OCTGN/Data directory. Load your cards with the o8d file included in the zip file.
Download big sheets
To create a custom deck with this in Tabletop Simulator, go to Objects -> Components -> Cards -> and create a Custom Deck. Set the custom deck settings like below. If you have any sideways cards (schemes, side schemes), follow these directions to rotate them.
- Type: Rectangle (rounded)
- Face: pick a front.png file
- Unique Backs: checked
- Back: pick the corresponding back.png file
- Width: 6
- Height: 4
- Number: the number of cards in your export
- Sideways: unchecked
- Back is hidden: checked
Printable PDF
This is a letter or A4 sized PDF with cards in a 3x3 grid for printing. One page has the card fronts, the next has card backs. Flip the page over the long edge if you print double sided.
To add bleed on the images, the PDF will use your bleed settings from the Download options -- set Advanced Edit Mode on!
Download individual images
This is a set of individual cards that you can do whatever you want with!
Image options
Bleed - stretches or mirrors the outside edge of the image. This makes it easier to cut the card after you print it.
Format - PNG is almost always the best option. If you use a compressible format (jpg, webp), you can set the compression to reduce the file size at the cost of quality.
Size - the length and width of the image in pixels. By default it is 1500x2150 px at 600DPI.
PSD exports
This is an experimental feature and completely unsupported. I will not take any requests to improve it, will not fix bugs with it, and will humiliate you if you ask for anything related to it.
You will see the PSD export button when you enable Advanced Edit Mode. Click it to get a .psd of your current card.
In order to use this in Photoshop, you need to:
- Have all fonts installed in your system. (You're on your own to find them.)
- When you load the file, Photoshop will prompt you to update the layers. Do it.
- If you still don't see text, select Type -> Update All Text Layers from the main menu.
There will be many errors and issues with the PSD. You will have to fix them yourself.
Common issues
The rules text is too long
If your rules text goes past the end of the card, hit the Fit Rules button. It will automatically adjust the size of your rules.
img
You can also manually adjust the font size, line height, and other parts of the rules text if Advanced Edit is on.
img
Headshot is in the wrong spot
If you have a headshot on a card and change the card type to promo or player side scheme, the headshot may not move to the correct spot.
If that happens, click the "Reset" button on the Left-Right and Up-Down controls to move it back to a good starting point.
Formatting Action / Response / Interrupt text
If you want to make your Action and Response and Interrupt text look like a real card, do this. Note the long dash and the placement of bold and italics
Flavor Text — Hero Action (attack): Rule text goes here - the effect begins lowercase.
<i>Flavor Text</i> — <b>Hero Action</b> <i>(attack)</i>: Rule text goes here <code>-</code> effect.
Using the right characters
If you notice your - or -> doesn't look like a real card, first check for the correct special character in the editor.
Common issues include:
- Use
-<code>-</code>
instead of -> - Use —
—
instead of - - Use
.<code>-</code>
as a dot - To make a list, use the
.List special character<span class="list"><code>.</code><span>Put your rule text here</span></span>
Obligation card types
There are a few variations of obligation cards. Make sure you pick the right one.
- Hero obligation: select the Hero - Obligation card type. Hero obligation cards use the same color scheme as a regular hero card but without the headshot in the corner.
- Villain set obligations: select Villain - Obligation with both Other Obligation Layout and Cracks On
- Modular/encounter set obligations: select Villain - Obligation with Other Obligation Layout and Cracks Off
Hard to read copyright / author text
If you cannot read the copyright/author line on the card because of a light background color, select the Add Bottom Shadow option on hero cards. On villain cards, make the Background Gradient Lower darker.
Advanced stuff
Images on top of text
To set an image on top of the card, upload it as a Front Card. It will sit on top of everything on the page except the headshot and resources.
img
Font size and line height
Add custom formatting to text
The card maker supports some HTML, and you can use that to format your card.
For example, add the code below to the card rules to add a large acceleration icon on your card:
<div style="line-height:300px;text-align:center;font-size:300px"><code>a</code></div>
Champions card order and set numbering
Official Marvel Champions sets usually have their cards in a specific order with specific numbering rules. This captures the most common rules used. There are always exceptions within specific sets.
If you use the set manager to auto sort your cards, these rules will be applied automatically when you auto-sort them.
Here are the rules which apply to all sets:
- If there are multiple cards within a section (ex. many event cards), they are ordered alphabetically within that section
- If there are multiple copies of a card, each has a sequential set number (ex. 8, 9, 10).
- All cards are numbered except for hero/alter-ego cards and hero obligation cards
Here is how hero sets are ordered in the most recent published sets:
- Hero card and Alter-ego card.
- These cards are not numbered
-
Permanent cards.
- Multiple permanents are sorted as if they are a mini set using these same rules
- Non-permanent cards mentioned on the Hero/Alter-ego card
- Cards like Winter Solider's Cybernetic Arm or Jubilee's Shopping Spree are mentioned on the hero cards. These come right after the hero card.
- Ally cards
- Event cards
- Player side schemes
- Resource cards
- Support cards
- Upgrade cards
- Hero obligation cards
- These cards have the same set name as the hero, and they are not numbered
- Make sure you use the Hero Obligation card type for these
Here is how villain sets are ordered in the most recent published sets:
- Villain cards
- Ordered from stage 1/A to 3/D
- Main scheme cards
- Side A and B get the same set number
- Villain permanent cards
- Multiple permanents are sorted as if they are a mini set using these same rules
- Hero nemesis minions
- Hero nemesis side scheme
- Environment cards
- Attachment cards
- Minion cards
- A hero's nemesis minions are sorted separately (above). All other minions in a nemesis set go here.
- Villain obligation cards
- Make sure you use the correct Villain Obligation or Modular Obligation card type for these.
- Side schemes
- Hero's nemesis side scheme always comes after the nemesis minion.
- Treachery cards
Example card descriptions
Learn about the example cards below
Champions-specific HTML codes
The card maker supports some, but not all, HTML tags and styles. To add HTML, put it in the appropriate form field.
Note that even if your card looks correct in the preview, it may not look the same when you download an image.
Below are the HTML codes for the most common Marvel Champions symbols and fonts.
| Symbol | Example | Code |
|---|---|---|
| Acceleration | a | <code>a</code> |
| Boost icon | b | <code>b</code> |
| Crisis | c | <code>c</code> |
| Consequential damage | d | <code>d</code> |
| Energy | e | <code>e</code> |
| Amplify boost | f | <code>f</code> |
| Per player | g | <code>g</code> |
| Per pod / group | t | <code>t</code> |
| Hazard | h | <code>h</code> |
| Artist | i | <code>i</code> |
| Mental | m | <code>m</code> |
| Infinity | n | <code>n</code> |
| Physical | p | <code>p</code> |
| Boost star | s | <code>s</code> |
| Unique | u | <code>u</code> |
| Per player | v | <code>v</code> |
| Wild | w | <code>w</code> |
| Cost arrow | - | <code>-</code> |
| Long dash (cost for permanents) | — | — |
| Rules line break | line 1 line 2 | <hr class="br"/> |
| Rules horizontal line | text text | <hr/> |
| Font example | Code |
|---|---|
| Traits | <em>Traits go here</em> |
| Bold action text | <b>Action goes here</b> |
| Rules flavor text | <i>Flavor goes here</i> |
Leader cards and non-standard card types
To make a Leader card, change the card type to "Villain - Villain", then overwrite the card type with "Leader".
To make other non-standard card types, do the same as above, but change the card type to whatever you need, then write the type in the card type field.
When to use cracks on encounter cards
Villain set cards, such as All in a Day's Work, use cracks in the card background.
Modular set cards, such as Under Fire, do not use cracks in the background.
Advanced problems
My side scheme in TTS is upside-down when I zoom (hold alt)
That's because the "is sideways" option in TTS rotates the card to the left, but Marvel Champions sideways cards rotate to the right.
You can fix this by:
- Use the TTS download options in the card maker. It handles the rotation automatically when you load the save game.
-
Use TTS scripting.
- Add the card using Object -> Components -> Custom Card. Leave "Is sideways" unchecked
- Right click the card on the table
- Select Scripting -> Scripting Editor. It will open to the Lua section for that card. ("Card Custom" will be selected.)
-
Add this code in the empty text box.
function onLoad() self.alt_view_angle = {180, 0, 90} end - Click "Save & Play"
- If the angle is still off, add or subtract 90 degrees from each field until it's right.
I have my own card images, and I want to upload them for online play
It's pretty easy to use this tool to upload cards you created in Photoshop for TTS or your favorite online table. To begin, make sure your card images are 1500x2150px.
Use the Load -> Load Images menu. Then pick your images, name each card, and select the card type and submit.
Now you can use the Download option to export it to your tool of choice.
The app won't load
A set in my browser storage won't load
This could happen if there is an error saving to the browser storage or if there is a serious problem with custom HTML you added to a card.
For auto-load issues when you first load the app, click this URL to reload the card maker and clear out the auto-saved cards. Other sets in your browser storage will remain untouched: Clear auto save
If it is a different set in your browser storage that causes the issue, you can delete it here: DB manager